
One of the many questions in the mind of a typical smart homeowner like myself would be how to install an ECOBEE thermostat. With the dawn of IoT (internet of things), smart homes that are controlled with data are currently the trendiest in most smart cities. One of the greatest accessories to have in any smart home is an ECOBEE thermostat. Well here is a hit; this smart thermoregulator can control the hot, warm or cold feel of your house with a mobile phone! The buzz doesn’t just end there. You can also regulate your house temperature from miles away. The following is a write up on how you can install the ECOBEE smart thermostat in your home.
There are two different smart thermostats that ECOBEE sells; the Ecobee4 and the Ecobee3 Lite. This manual uses an Ecobee3, however, the installation and setup process should be identical for both products throughout.
Please note: This is a project for those who are into the “DIY” thing. There is no shame in getting someone else to perform the wiring for you in a situation where you don’t have the ability to do so. If you read the start of my article and immediately got a clue on how to install an ecobee thermostat based on your past experience wiring switches and outlets, you’re probably good to go. If you opened this write up with uncertainty on how exactly we were going to pull off this trick, it is time to phone in that wiring-savvy friend or electrician. Notice that it might be contrary to code, the law, or regulations to achieve this with no permit, or it might void your insurance or guarantee, so please do check your local regulations.
What Is an Ecobee Thermostat and Why Would You Need One?
The Ecobee isn’t quite as popular as the well-known Nest Thermostat, but it does come with some special features that Nest users can’t get.
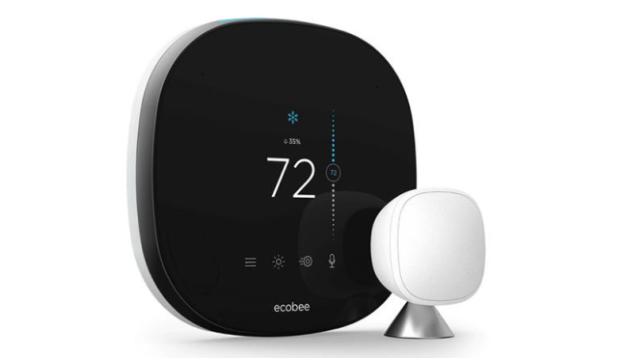
As with other smart thermostats, the Ecobee line of thermostats allows you to control and handle your home’s temperature from a smartphone. Is that not cool? Imagine adjusting your thermostat hundreds of miles from home.
In addition, there are detectors that you can place in various areas of your home, as well as an easy-to-use touch screen display.
Smart thermostats are not something you’ll interact with a whole lot, particularly in the case where you have to customize for personal use. The capabilities of a smart thermostat are very convenient such that they can be programmed to adjust the temperature of your home till you get home from work or vacation. Isn’t that cool?
Here is How to Choose a Smart Thermostat as a Smart Home Enthusiast
Can the Ecobee Work in My House?
One consideration to keep in mind when getting an Ecobee thermostat is that it would definitely work with many HVAC installments, but you will need to understand what kind of system that you have so that you could set up the thermostat properly.
The Ecobee (as with most other smart thermostats) works with almost any low-voltage system, as well as high-voltage systems (that are also known as “line voltage” systems). If you are not sure what sort of system you have, you can quickly pop off your existing thermostat and take a look at the wiring.
A dead giveaway to know a protected system is if you see a couple of little wires in all kinds of different colors, but should you see just two or even four larger wires (usually red and black) which are linked with wire nuts, then that is a sign of an unprotected system.
You can also look at the thermostat to see how many volts it is. Should you see something like “110 VAC”, “115 VAC”, or “120 VAC” anywhere, then you have a grid program.
If you have a high-voltage thermostat system, then you’ll have to follow the to-do-steps as described on Ecobee’s support site. This would likely need a professional to install.
With all that said, if all looks good, here’s how to install and set up your Ecobee smart thermostat .
.
How to Install an ECOBEE Thermostat: Installation Steps
1. Remove Your Thermostat
The very first thing you’ll want to do is turn off your thermostat. It will still be on, but you’re the only turning off the cooling, heating, and the fan. You’ll also want to remove batteries that are meant as a backup in case your thermostat has any. This backup batteries are always likely to be underneath a cover or mounted behind the thermostat.
Next, you’ll have to cut electricity to your home’s heating and cooling systems by flipping the breakers off at the breaker box. Keep in mind that the furnace and the air conditioner would be on two breakers, and that means you’ll have to switch both off. Additionally, it is likely that the system fan itself may be on a different breaker.
You might also have to turn off a fourth breaker for the wire that gives the thermostat power. The diagram for your breaker box may say which breaker the thermostat is on, but if not, it’s a safe bet that if your thermostat is located in the living room, turning off the breaker for the living room will do the trick. Furthermore, your furnace’s main shutoff could be next to the furnace itself instead of on the breaker box. Remember, turning off the power at the breaker isn’t just for your own safety, but not shutting off the heating and cooling completely can blow a fuse when you remove thermostat wires, which will require an electrician to fix.
After the power is completely off, remove the thermostat from the wall. It’s usually just clipped in and requires only a slight tug to take it off, but you may need to unscrew yours.
From there, you’ll be able to see the wiring for your thermostat. here, I would recommend taking a voltage tester and checking to confirm that there is no power running through any of the wires. If there is, then you need to go back to the breaker box and try turning off another breaker.
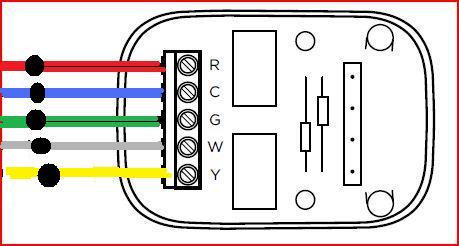
Then take a photo of the current cable setup and notice which terminal each cable is attached to (this is a critical step, so don’t forget!). The majority of the time, the color of the wire will correspond to the letter of the twist that it’s attached to (e.g. yellow wire connected to”Y”, the white cable attached to”W”, etc.), but occasionally you might have something like a blue cable attached to”Y” or some green wire connected to”B” for some odd reason.
After you have taken note of where all the wirings go, unscrew the wires from their screw terminals. If there are any short cables going from one terminal to another you can remove them and throw them away, as you won’t need them for the Ecobee3 installation.
As soon as you’ve disconnected each the cables, you can fully get rid of the thermostat and remove the wall plate of the thermostat if it has one. It’s probably fastened to the wall using a couple of screws.
2. Install the Ecobee Thermostat
Take the Ecobee’s base plate and put it on the wall where you want the thermostat to go, feeding the wires through the hole in the center as you do so. Use the built-in leveler at the bottom to make it level. From there, you can use a pencil and mark where the two screws need to go–one on the top and one on the bottom.
If there’s a stud behind the drywall where you want the screws to go in, you’ll need to drill pilot holes first before screwing the base plate in. Otherwise, the included screws can easily be driven into drywall without pilot holes. The kit comes with drywall anchors, but they aren’t absolutely necessary.
When you’re ready to drive in the screws (a drill is highly recommended for this), place the base plate back on the wall where you want it and feed the wires through the center hole (include the trim plate behind the base plate if you want–it’s good to use this if you don’t want to plaster and paint over the spot where the old thermostat was). Take the two screws and drive them into the wall, making sure that the plate remains level as you do so. Be sure to screw in the top screw first, and then make fine adjustments to level out the base plate before you screw in the bottom screw.
Before you plug the wires into the base plate, you’ll need to check and see if you’ll need to install the included Power Extender Kit (PEK). This is a small device that gets installed on the circuit board of the furnace unit itself and it adds in a “C” wire to your setup if it doesn’t have one already. If you’re not sure if you need to install the PEK or not, just look at your thermostat’s wiring. If there isn’t a “C” wire, then you’ll need to install the PEK.
You have to start off by opening the casing of this device so as to install the PEK. After opening it, you’ll notice four terminals on the lid portion.
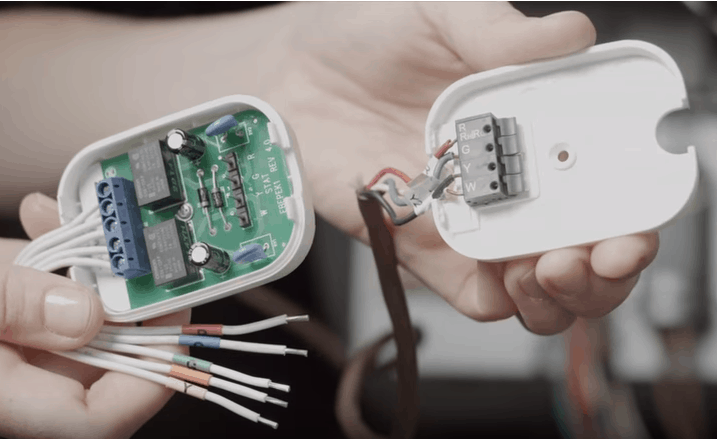
Then find the wires you are going to want for your PEK. To do this, take off the furnace so that you can access what is inside–it should be able to open if you slip it an inch or two in a specific direction and then lift it off. The wires you need will be found over a strip of screws on the furnace’s circuit board.
You then need to simply take out the corresponding wires from the circuit board and attach them to the terminals on the PEK, also make sure that there is a correspondence, that is to say, the terminal which you took the wire out of matches the terminal that you want to insert the wire into in the PEK.
From there, put the PEK back together and then take the color-coded white wires on the PEK and connect them to the corresponding letters in the terminals on the circuit board.
The process to install the PEK can be extremely confusing, and since HVAC installations always seem to differ, don’t hesitate to phone Ecobee service if you get confused or things eventually go south. They can lead you through the procedure if need be!
Once the PEK is set up, return to your own thermostat and plug the wires in the Ecobee’s base plate. If you are not sure where each wire goes, return to the picture you took of the wiring set up on the thermostat earlier on, and apply the letters to see exactly where each wire goes on the Ecobee’s base plate. Again, Ecobee support can walk you through this procedure.
Be sure to straighten out any wires that need to be straightened before you insert them into the terminals. This could be done with needle-nose pliers.
To insert and fasten a wire, press down on the tab near the terminal and then push the wire to the terminal as much as it will go. Release the tab and give the wire a big tug.
Choose the main Ecobee device and push it in until it clicks into position. You may want to press it in multiple locations to ensure it’s fully connected.
Return to your breaker box and then turn the electricity back on to every breaker which you turned off. Also, make sure the units have kill switches that turn off the furnace. When the payment is taken load you place the cover back on the furnace. Once you turn the electricity back on, the Ecobee3 will automatically boot and the installation process will begin.
3. Fix the Ecobee
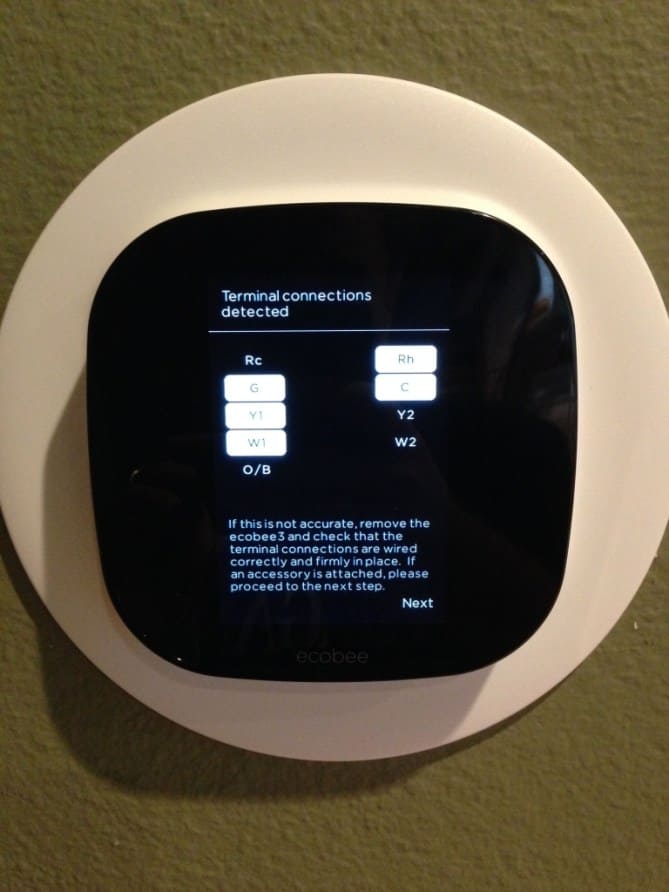
- The first screen you would see when the Ecobee boots is an affirmation of your wiring is “Tap on “Yes” if it’s correct.”
- You’ll be asked if you have any accessories connected like a dehumidifier or ventilator, to your HVAC system. if you have none then, select “No” then tap on “Next”. Please note that most HVAC systems have something similar to this, but the old systems do not unless you put it in.
- Select your preferred temperature reading (Fahrenheit or Celsius) and then hit “Next”.
- On the next screen, you will observe the equipment setup. It will attempt to automatically choose what kind of cooling and heating you have, but if you desire something else, just tap on the downward arrow next to the option and change it. Tap “Next” when you are done.
- You’ll have to name your own thermostat afterward or you may type in your custom name.
- On another screen, you’ll have to choose your perfect temperature during the winter when the heating is on. Just tap and drag your finger onto the side of this screen. Tap on “Next’ when you are done.
- You’ll also do the same thing for your ideal temperature in the summer when the A/C is running.
- After that, you will be asked the model of your HVAC system you would want. This merely just tells the Ecobee3 exactly what it should begin at.
- The next screen will have you disable or enable a smart Home/Away function if it finds that you’re home during an off interval or vice versa using the motion sensor built into the Ecobee smart thermostat.
- You’ll now select your own time zone by first selecting your state of residence and then tapping on “Next”.
- From there, you are going to select the closest large city that’s in precisely the identical time zone you’re. Hit “Next”.
- After that, it’s time to configure the Wi-Fi for the thermostat, so tap “Next”. This will let you connect your smartphone to the Ecobee.
- You can either use your iPhone or iOS device to set up the Wi-Fi or you’ll be able to put this up directly on the thermostat. We’ll show you how to get it done on the thermostat itself, so, select “Select Wi-Fi Network” then hit “Next”.
- Select your Wi-Fi name and then hit”Next”.
- Enter your Wi-Fi password and then tap “Connect”.
- Give it a moment for the thermostat to attach to your system. Once it’s completed, tap on”Next”.
- Verify the time and date the thermostat has set up and then hit “Next”.
- The next step is in connecting the Ecobee thermostat and connecting the thermostat to an Ecobee account. Your thermostat will produce a registration code to do this.
- You’ll need to enter the code in the Ecobee app, so now is a good time to download the app, which is available for iOS and Android devices.
- Open the app and then tap on “Register” at the bottom.
- Enter in the registration code that appears on the keypad then hit “Next” in the app.
- Place a checkmark in the box next to “Accept Terms & Conditions” and then tap “Next”.
- On the next page, enter your name, email address, and a password to use for your Ecobee account. Hit “Next”.
- Choose whether or not to have the weather boost your heating and cooling by toggling the switch in the screen’s corner. Then tap on “Next”.
- Do the same thing for Home IQ, which is a feature that offers reports and tracks your use.
- Next, enter information about your home, such as the square footage, number of floors, and when your house was built. A few of the fields are for in case you need Home IQ to get the job done, although none of that is needed.
- Hit “Done” when you get into the Congratulations screen.
- Now you can tap on your Ecobee thermostat and begin controlling it on your mobile phone.
- The user interface will probably mirror what it looks like on the thermostat itself.
4. Establish the Remote Sensor(s)
After your Ecobee thermostat is set up and ready to go, you would need to now set up the remote sensors. If you have an Ecobee4, it comes with one sensor, but you’ll need to buy them separately if you have the Ecobee3 Lite.
To start, simply pull on the plastic tab attached to the sensor. This will pop off the plastic battery cover.
From there, attach the plastic, putting it in a different room whose temperature you would like monitored and then place it behind the sensor. I put mine there since the temperature is determined by the next floor.
Back at your thermostat, it will now detect the detector. Tap on”Yes” to connect it.
Give it a tile by choosing one from the list or typing in your own custom name.
Select which styles you want the sensor to be triggered on. If you are not certain what to do here, just leave it to the defaults and tap on”Next”.
Tap “Finish” to finish the sensor’s set up.
Your sensor will appear in the listing and it’ll show up the temperature which it is detecting. Tap on “Follow Me” to configure if the sensor is going to be used.
You can either enable or disable the Follow Me feature. Your thermostat may use the temperature in the sensor that detected movement when enabled. When disabled, your thermostat will take the temperature of all the detectors.
When you have your sensor(s) setup, you are ready to go and your Ecobee setup is complete. Take some time out to peruse the Ecobee app to get knowledgeable about its attributes and the interface.
Check out 6 Best Smart Thermostats for 2020: Unparalleled Reviews
Frequently Asked Questions
Can you install Ecobee yourself?
Can you install Ecobee without WiFi?
Is Ecobee a two-stage thermostat?