
Voice-controlled smart mirrors are really cool gadgets to have, and here, we’ll be guiding you on how to build these awesome beauties and improve on your home’s smart look.
Mirror Mirror on the wall
Who’s the smartest of them all?
Well, seeing as you own a voice-controlled smart mirror, you most assuredly are!
How Do You Install a Voice-Controlled Smart Mirror?
I happened to come across the ‘Magic Mirror’ project when searching for a smart mirror for my house. Much to my bewilderment, most of the cool mirrors cost a limb. I was never spending all that money on a mirror that did nothing else but present me with my not-so-pretty face every morning. It was definitely going to do more than that.
This was when I discovered the wonder of voice control. What’s cooler than a mirror that gives you useful information before you start your day? One that also incorporates voice controls so that you can update your calendar, play Spotify playlists, and so much more. This is an absolutely incredible and futuristic add-on to your home that will thrill your friends, family, and pets!
Here’s everything you’ll need to complete this guide on how to set up a voice-controlled smart mirror.
The first and most important items you’ll need to get are:
| Item description | Quantity |
| “Always-on” computing device (here, we used Raspberry Pi 3) | 1 |
| Two-way acrylic mirror (3/16″) | 1 |
| LCD Screen (a monitor screen preferably) | 1 |
| Cordless drill | 1 |
| Raspberry Pi 3 case | 1 |
| Cord channel kit | 1 |
| Sprong brush | 1 |
| Minwax Helmsman Spar Urethane | 1 can |
| HDMI cable | 1 |
| USB microphone | 1 |
| Wood glue | 1 bottle |
Other items you’ll need for the setup include;
- A MicroSD card (32GB)
- A Raspberry Pi power supply (2A)
For an added advantage, knowledge of programming comes in handy. Also, you should bear in mind that the process won’t be straightforward. You will need a lot of patience at almost every stage of this process. Cash too, as you might need to spend extra to her replacements for items that get damaged in the course of the setup.
I would like to, however, add that I definitely took the longer path in making the mirror. Quite a few of the processes could be shortened. However, I learned something new at each step, so I guess it was a good value for the money.
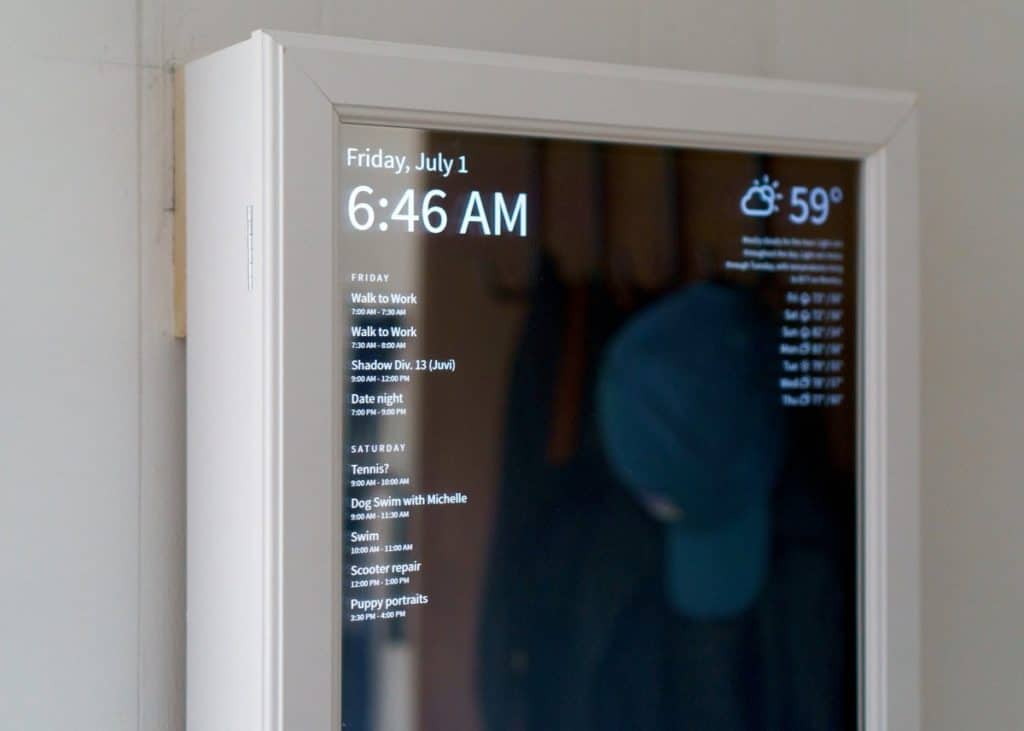
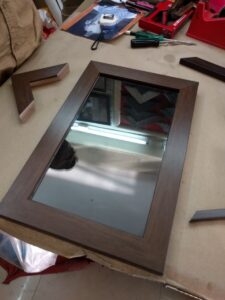
Let’s have a look at what the finished product looks like for added motivation.

The finished product.
How Does a Smart Mirror Work?
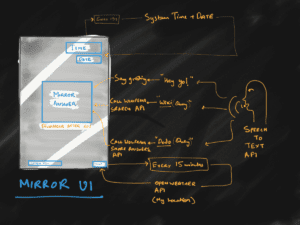
There are three major aspects to the voice-controlled smart mirror. The attached highly technical drawing illustrates how these components work together.
- Hardware for computation
- Software for voice control and
- The Mirror
Components 1 and 2 are definitely crucial for component 3 to work functionally. Your choices on the specifics of the mirror depend on your artistic inclination; if you are ok with using a black mirror (which I strongly advise against), you can ignore component 3.
Let’s look into these aspects one after the other.
Hardware for Your Voice-controlled Smart Mirror
Hardware includes all the physical components of the mirror, which you would need for computation. It does not encompass the aesthetic elements of the mirror such as the frame, glass, etc. Here is a list of your requirements.


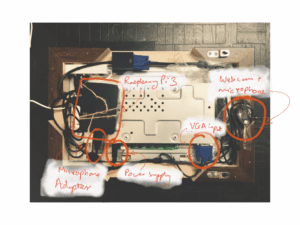
A Raspberry Pi
The Raspberry Pi is a small computer that powers the entire set up. It also serves to display the Magic Mirror interface and manage Jasper (the voice-control system).
The Raspberry Pi is essentially a mini-computer. It serves as the point of input for all of your software. Although I have used a Raspberry Pi 3 for the project, you can definitely use any version of Pi. The main advantages of Pi 3 are that it has inbuilt modules for Bluetooth and WiFi as well as an HDMI port. Whereas, in the other editions, you’ll be required to install these separately.
MicroSD Card
You’ll be needing a MicroSD card with a minimum of 2GB of storage for the Pi. I’ve used an 8GB Micro SD just to be on the safe side. However, a 4GB piece should do just fine.
Mini USB Cable with Adapter
Power supply to the Pi is through a Mini USB cable with a 5V adapter. I discovered that its functionality is just as fine with any mini USB phone charger.
Raspberry Pi Case (Optional)
I suggest acquiring a case for the Pi on the grounds of added safety. There are loads of cool cases accessible online.
 Microphone
Since voice recognition is one of the main abilities of the mirror you are assembling, this is an absolute necessity.
Tip: You could improvise and use a cheap webcam with a microphone. However, the webcam hasn’t been used in the project.
Microphone Adapter
Amazingly enough, the Raspi 3 has no default support for mics. You will, therefore, need to get a microphone adapter and install the adapter’s drivers. In the next section, I will be covering all the aspects of setting up the Pi and installing drivers.
Monitor/LCD Screen
The Magic Mirror is practically an LCD screen placed behind a Two-way mirror glass. You’ll need to acquire a working monitor (any size). An option with HDMI support would be preferable too.
The mirror interface functions better if the glass is as close to the screen as possible, it is, therefore, a better option to take off the plastic bezels and casing around the monitor. Do this very carefully. Here is a link that’ll help.
I suggest that you get an LED monitor to ensure minimal power consumption, maximum picture quality, and also, to avoid having a mirror that glows at night. I would also recommend that you get a monitor that comes with inbuilt speakers, but this is not mandatory.
HDMI Cable
This is essential to connect the monitor with the Raspberry Pi. If, however, your monitor has no HDMI support, you’ll have to use an HDMI-to-VGA converter.
Mouse and Keyboard
You’ll need this during the setup and also, for fixing bugs.

Software for Your Voice-controlled Smart Mirror
Here are some links showing step-by-step tutorials on how to get started
Setting up your Raspberry Pi 3
Hosting a local server (only the first half of this video is necessary for this context)
WebAPP
If you’re not so excited about the idea of writing code, I have this sample web App for you. You can find the link to the GitHub page here. You’ll have to exercise some of that patience we talked about earlier as it wouldn’t work instantly. You’ll also need to put in API keys for some components.
Where You Can Find API Keys
Wolfram Alpha (You’ll have to sign up to create the key. Afterwards, add the key to the file name wolfram.js)
OpenWeather (Put in a key to the filename weather.js)
Finally, host the WebApp on the local server you created. Here’s how you can do it.
Note: A Chrome browser is best suited for these operations.
Key Phrases For Your Smart Mirror
Since the mirror depends on your choice, and not proximity, to be activated, you’ll need to know the wake-words recognized by your smart mirror. Here is the list of phrases you can use to trigger the mirror:
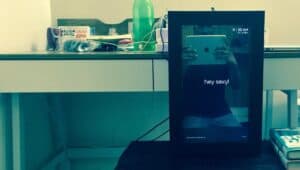
- “Hey yo”: This prompts the mirror to respond with a greeting. By default, it refers to you as “sexy”. However, you can change this in the app settings if you don’t feel it sounds motivating enough.
- “Wiki”: You should follow up on this command with a request. For instance, “Wiki Awesome ways to knot a tie”.
- “Dodo”: Follow up on this command prompt with any question. For example, “Dodo, what is the hottest spot on Earth?” or “Dodo, how old can a tortoise live for?”. Dodo answers most questions quite accurately, he gets them wrong quite often too though. Which, I believe, is why he is referred to as Dodo.
A video of the working AI
The User Interface
The main purpose of the Magic Mirror is as a mirror first. This comes before it’s embedded intelligence and information rendering capabilities. It was a very deliberate decision making the UI as minimal as possible and presenting it only if it was really important. The mirror is operated entirely by voice, so the responses had to be temporary and short. Answers typically are erased after about a minute. In the absence of an internet connection, the mirror can still serve as a clock and reveals the current date.
The mirror needs a high contrast ratio for the sake of readability. You can use a combination that has a high contrast ratio (preferably the black and white color palette since it provides high contrast without interfering too much with the mirror reflection). Since it emits the highest amount of light, all the elements are elements, while the background is black since it emits the lowest amount.
Here’s the UI detail.

The Mirror
A Two-way Mirror
The Two-way mirror is to be placed in front of the LED screen, as is shown in the figure above. You can find one at any hardware shop. The two-way mirror is made of acrylic and fits properly over the monitor, permitting the graphics on the monitor to shine through while preserving the mirror effect.
You can place an order for your mirror on Tap Plastics. Order the thicker mirror option (3/16″) to avoid a “funhouse mirror” effect where your image is warped.
Building the Mirror Frame
The box/frame contains all the components, including the microphone, and can be aesthetic. This is completely up to you though. In my case, I wanted the mirror to fit in as a part of the house and not result in the build-up of an ugly mass of wires and cables. So I employed the expertise of a local vendor to develop a wooden frame for the setup.

Total Cost
The total cost for this project (including the wood, monitor, Raspberry Pi, and mirror) was in the range of $300 – $350.

Fixing the Other Aspects of Setup
Cutting the Box
I picked up a long piece of oak from Home Depot. I then cut all the wood to length, based on prior calculations.
Box Building
I then used Wolfcraft’s handy jig to construct a tidy 90-degree angle and then used counter-sinks and # 8 screws to shape the box.
Building Frame Supports
Because I will be affixing the frame from the bottom, I need to attach a couple of supports. I cut a few thin pine bits from the inside and screwed them in place. The screws that I used were proportioned so I didn’t perforate the side of the box.
Cutting the Frame
Now that the box has been constructed, it is time the frame was built. I calculated and cut my frame parts, then cut the ends into 45-degree angles using my compound miter saw. Clipping each piece together and then cutting it with my miter saw guarantees the edges are at a 45-degree symmetrical angle. Do not forget to square your saw— to do this, I used a few pieces of scrap pine to calculate the production and calibrate my saw as needed.
Affixing the Frame
I’m going to fasten my framing from below so that the screws don’t appear, but I need to get the frame nice and tight first. I will glue it together to do this, give it time to set it, and then move ahead to fasten it from underneath. I set down a newspaper, introduced a small amount of wood glue to each corner, squared it all up with my speed square, and then used clamps to hold it all. Then, I was going to have to wait a day to cure the glue.
Note: Before gluing your frame, calculate one last time to ensure that its inside measurements are still accurate (as a mistake at this point can be quite expensive, both time-wise and material-wise!).
As long as you have a pocket hole jig, the framing procedure will be much simpler.
Once the frame was connected to the case, I applied a small amount of glue to the box’s rim and then pushed screws through my box’s supports to secure the frame from the underneath. The screws will not appear from outside this way yet the frame will be firmly fixed to the box.
Getting the Frame Sand-ready
 The frame is now sanding-ready! I constructed a medicine closet. I measured the box slightly smaller though, so I won’t be putting an internal support on one side of the frame. This implied that I used a little extra glue as well as those clamps to keep it in place and hold that particular side secure. I’m ready to stain my box and sand it now.
Sanding the Frame
I used the 220-grit sandpaper and my power sander to sand all the frame and box exterior surfaces. The oak I bought had already been beautifully finished so I didn’t have to go rougher than this. I then wiped off the excess sawdust with a wet towel.
Staining the Frame
Note: Avoid applying excess stain dry on your frame. Be careful to remove the excess before sealing begins.
Sealing the Frame
 I added a thin layer of polyurethane sealer, using a silicone brush. Doing so will preserve the wood and my fleece.
 Using a foam brush, I administered a light coating, waited 4 hours and then, using 220-grit sandpaper, gently hand-sanded. That guarantees even visibility.
Applying the Second Coat
 And from there I put on a second coat, waited a further 4 hours, and after that, sanded slightly with a marginally finer grit sandpaper.
 Applying the Third Coat
It’s unnecessary to add a third coat but I made the decision to go through with it. I developed a 50/50 blend of polyurethane and paint thinner for the third and finish coat. The final coat will also make sure that tiny grooves, as well as other holes, still get a good coat. I had to wait 24 hours after the final coat for everything to cure adequately.
Looks nice!
Installing USB Ports
To make debugging easier I wanted some USB ports to also be installed. This way if I didn’t want to tether to my Pi remotely I could easily install a keyboard or mouse. I might introduce a Bluetooth dongle down the road too. I found it on Amazon. Normally, it is used for mounting USB ports in your car dashboard.
I made use of a 1-1/4″ hole-saw to cut a hole at the top of the mirror and then screwed the plastic nut tight behind the USB port.
Drilling Ventilation Holes
My monitor and Raspberry Pi will certainly create a bit of heat so I’ve drilled several 1/4 “ventilation holes in the top and base of the frame. The holes will not be visible once the display is installed, because the front-facing corners of the frame stretch further than the sides. I suppose you’ll notice them if you stared closely at the top or bottom of the screen, but the monitor is pretty tall, and this would be very unlikely.
Adding Mounting Tabs
Next, I fitted the mirror with some mounting tabs. I cut out two little triangles from oak and bored a hole in the middle of either. Next, inside the frame corners, I glued and screwed each to the edges. I’ll be able to maneuver the screws through these mounting holes from outside after connecting the screws to the wall, and the screw heads will prevent the mirror from slipping forward and to its demise.
Attaching the Mirror Material
It’s now time to put the mirror on! I used some trash bag material around the exterior since I plan to remove the protective film from the mirror. This will prevent it from getting etched while I’m finishing up the work.
About the Mirror Material
I stripped the external protective film from the mirror and installed the mirror. Since the mirror material is 1/8″ (you could also request sturdier material for additional money), I used a bit of tape to secure it in place and stop it from sliding. If you use silicone to keep it in place, or if your mirror is too large, you run the likelihood of a “funhouse mirror” effect in which the material will distort and then you’ll look like a Conehead.
Fortunately, I didn’t find any need to cut my mirror; I placed an order based on size. However, in a case where you have to cut your mirror, the manufacturer has provided a nice guide here on how to do so.
This video offers a very apt example of what can happen if you are using the slimmer mirror material for a really big mirror (read: funhouse mirror).
Cutting a Cord Slot and Microphone Hole
I used my Dremel and a multifunctional bit to cut a tiny slot at the back to pass a power cord through it. I would like to eventually add a power outlet behind the mirror, but I want to be lazy and power it this way for now.
First, I bored a hole through for my microphone. I put it at the base of the mirror, where you will not see it. The microphone as a whole is versatile, so I can still take it out further and loop it around the base of the mirror when it doesn’t collect sound adequately. I didn’t want to drill a hole in front of the mirror and ruin the look, though that’d possibly be the perfect microphone spot. Whenever you can spot a flush microphone that is decent, go ahead and get it.
For this setup I will use the built-in speaker of the monitor. It’s not quite as loud or clear as a Bluetooth speaker but it’s going to serve for now. You can always attach the speaker subsequently via Bluetooth and set it beside the mirror.
Setting the Monitor in Place
Long wooden blocks keep the display in place from the sides, which also serve as support components for the frame itself. But to prevent the monitor from falling and keeping it flat against my mirror I made some small, retractable blocks out of junk wood pieces. In case I need to get the monitor out, I can easily remove these supports. I don’t think I’m going to have to. However, just in case.
I properly cleaned the entire sawdust off of the mirror, removed the protective film from inside the mirror, thoroughly cleaned the glass on the monitor and installed the monitor. Then, I attached my monitor supports.
Routing Cabling
I needed to add it all to the rear of the monitor so that for whatever reason I would easily disconnect the monitor from the mirror. Although this was absolutely unnecessary. I used foam tape to strap everything and started routing my cables. To keep everything neat I used some velcro straps.
Cutting the Monitor’s Power Cable
Quick tip: Avoid using painter’s tape on your mirror as it can peel off your mirror’s finish and leave it looking scratched.
Hanging the Mirror
To create mounting points on the wall I used two wall anchors and powerful stainless steel screws. Then, I just threaded these screws through the mounting tabs I had created before.
Hiding the Cord
I used a Cordmade raceway cord to hide the cord. I plan to add an outlet behind it very soon, for premium awesomeness.
Microphone Close-up
Here’s a close-up picture of the microphone. As shown, it appears from the bottom and performs fantastically! Not bad for an $8 microphone. I suggest spending the money on a slightly nicer one since Jasper’s perception is slightly better, making it easier.
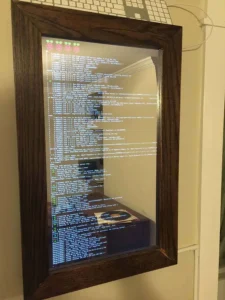
Installing the Magic Mirror Interface
Magic Mirror is essentially a webpage that’s hosted on a web server running on your Raspberry Pi. Originally created by Michael Teeuw, the Magic Mirror interface is really nice out of the box and only needs minor customization.
All done!
This has been a fun project, and it’s already given me tons of ideas for other projects. If you have any questions about doing this project on your own, post below and I’ll do my best to help you out.
Related Questions
What should I do when my mirror is large and my TV is small?
In a case where the mirror is larger than the display, you should pick a mirror that has a higher reflection. This allows the TV to be completely hidden.
The Glass Two Way Mirror and Glass Smart Mirror are about the same price in smaller sizes. However, when looking for larger two-way mirrors, the Glass Two Way Mirror is a great budget option.
What are some recommended adhesives I can use?
For DIY smart mirror projects, an essential aspect is fixing the screen to the mirror properly since the screen is usually smaller than the mirror. I recommend using black VHB tape and Black Mirror Mastic Glue. Both of these options create good bonding with glass.